Spinning with a Top-Whorl Drop Spindle
WARNING!!! Spinning reduces stress and promotes well being. It can also be habit forming and lead to obsessive behaviors such as, but not restricted to: caressing and hoarding all fibers; dying them with food colors and things from your garden or whatever you have laying about; spinning the fluffy bits of the weeds in your fields, the cotton wad in your vitamin bottles and even the lint from your dryer! Proceed with extreme caution!
To learn to spin you will need:
- A drop spindle (these instructions are for top-whorl drop spindles)
- Carded or combed fiber prepared for spinning
- A length of yarn to use as a leader
Drop spindles are primitive spinning tools, virtually the only spinning tool used until 1000 ad —the spinning wheel as we know it did not exist before the 1500’s. The drop spindle is still the primary tool used in remote locations throughout the world. It has become very popular among current handspinners in the last few years. If you find you love spinning, there are guilds all over the country where you can find fellowship, information and fun. The magazine Spin•Off, which is published quarterly by Interweave Press, Inc., 201 East Fourth Street, Loveland, Colorado 80537-5655, (970) 669-7672, is full of information about spinning and includes a list of spinning guilds every winter issue.
Fibers prepared for spinning can be purchased at fiber shops around the nation. There are several that will mail order listed in this website, use this link to find them: Favorite Websites
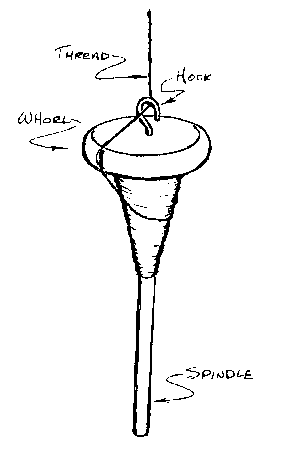
The Spindle
The top-whorl drop spindle has three parts: the stick is called the spindle; the disk on top of the stick is called the whorl; and the hook is called, simply enough, the hook.
The Fiber
Pull off a small section from one end of the wool preparation and gently grasp the fibers from this small sample. Pull out the few fibers and look at them. They look like hair and are constructed much the same as hair. Now set them down on a dark surface and pull out a few more fibers and lay them next to the first. Continue doing this until all the fibers in your little sample are loose and laying next to each other on the dark surface. Does it appear that the first fibers you pulled are longer than the last? It is a good practice to do this with every fiber preparation you spin—it tells you how far apart to hold your hands when you do a process we will describe later called drafting. Put all your sample fibers together and lay them aside for now—we will spin them later.
Terminology
A few more terms are in order here: when you twist your fibers together the resulting yarn is referred to as a thread or a singles. A singles may be used in weaving but unless carefully constructed is not the best for knitting or crocheting. If you wish to knit or crochet your yarn you must do another process called plying. Plying is twisting two or more singles together into a plied yarn. Other terms will be defined as they are described. These terms will appear in bold print when they are introduced and defined.
Beginning Spinning
Time to get started! First attach the leader cord to your spindle. A leader is a piece of yarn used to anchor your fiber to the spindle. Use a piece of yarn 12-18 inches long for your leader. Tie one end of the leader around the spindle just underneath the whorl. Turn the other end of the leader back on itself and tie a loop (use a square knot or an overhand knot, not a slip knot to do this). Bring the looped end up over the whorl and wrap it a couple of times around the hook. Let the spindle hang beneath your hand, suspended by the leader. As you spin thread, store it on the spindle by wrapping it in a cone shape below the whorl.
First Step
Take some time and get used to the motion and feel of the spindle. You may spin the spindle in either direction to make your yarn; however, a rule of thumb is to always spin the spindle clockwise (to the right), also called a Z-twist, to make a singles. Spinning counter-clockwise, or an S-twist, is then used to ply two or more singles together into yarn. The important thing here is consistency—if you begin to spin clockwise and change to counterclockwise your thread will fall apart! For this example use a clockwise twist, or Z-twist.
To get used to the feel of spinning before actually learning to do it, practice making the spindle rotate. Take the spindle in one hand and the leader in the other, spin the drop spindle from the spindle (stick part) with your fingers (like a top) to the right, let go and watch it spin. If this feels too awkward or isn’t working, try resting the spindle against your left thigh, lay your palm against the spindle and quickly roll it forward between your palm and thigh off your leg–it should keep spinning. If it is more comfortable to hold the leader in your left hand, put the spindle on your right thigh and roll it quickly toward your back and then let go, holding it only by the leader—it should keep spinning. Repeat this process several times until it feels less awkward before you start actually spinning a thread. You want to ultimately be holding just the leader and having the spindle rotating toward the right quickly, thus putting twist into the leader. The leader should be bunching up from all the twist.
Holding the Fibers
Depending upon your comfort with your practice session, decide which hand to use to hold the fibers and which hand to use to draft the fibers and spin the spindle. If you were more comfortable holding the leader with your right hand, use your right hand to hold the fibers. Reverse this if you were more comfortable using your left hand to hold the leader in practice. Many people have many ideas about which hand is "correct" —we will do what feels most comfortable–there is no right and wrong way! Choose a hand to hold the fibers to start with—if, after spinning a while it feels awkward, shift hands.
Tear off a 6-inch piece of wool and split this piece 3 or 4 times down its length. Hold one of these sections loosely in your fiber hand. Don’t clutch your fibers—you will bunch them up and sweat on them and make them unpleasant! Relax as you spin—if you tense up, you are trying too hard! Lay the fibers across your palm and gently hold them in place with your thumb. Use your drafting hand to pinch the tops of a few fibers and slide them out a bit–you don’t want to separate them from the fiber mass, just pull them out an inch or two. Put these fibers through the loop in your leader and fold the end back upon itself into the fiber mass. When you twist this it will attach your fibers to the leader.
Drafting
Your drafting hand also spins your spindle. Hold the ends of the fibers together with your fiber hand and twist the spindle a few times with your drafting hand. The twist runs up the fibers to the thumb of your fiber hand. You are pinching off the twist with your thumb and index finger at this point and not allowing the twist to enter the large mass of fibers. Give the spindle a good spin with your drafting hand, then stop it and park it (put it between your legs or under your drafting arm.) Use your drafting thumb and index finger to pinch off the twist (replacing your fiber hand) and gently slide out more fibers. The fibers between your drafting hand and your fiber hand form a small triangle called the drafting triangle. This area should never be longer than the length of the fibers you pulled out when you first looked at your wool (remember that little pile of fibers you pulled out?) Compare the size of the triangle to the length of those fibers. You should try not to allow the twist to run up into the fiber mass in your fiber hand, that hand should always be gently pinching down on the undrafted fibers. Later, when you become more accustomed to the feel and rhythm of spinning, you will find it easy to draft and not have to pinch off the twist if you lay the fibers over your hand and only let the drafting triangle or drafted fibers lay over your index finger and down into the thread. The twist will not run over your index finger and so the fibers on your palm (which is held palm up) will not be twisted.
What Next?
You have your spindle parked, your drafting hand has drafted out a few fibers and is holding back the twist there is a drafting triangle between your two hands and your fiber hand is gently pinching off the triangle at the other end. (And you are getting frustrated just sitting there reading)! Let go of the yarn with your drafting hand and watch the twist run up into the drafting triangle and stop at your fiber hand. You did it! This is called the inchworm method and is a great way to learn to spin.
Continuing to Spin
You have your fiber hand pinching back the twist and your drafting hand is free. Replace your pinching with your drafting hand, gently slide out some more fibers from the mass by pulling gently back with your drafting hand, pinch off the fibers near your fiber hand so the twist doesn’t run up into the fiber mass and let go with your drafting hand, allowing the twist to run up into the drafted fibers. Always keep tension on your newly spun yarn by gently pulling up as you draft and make more thread. By keeping tension on the thread, you are inviting the twist to run up into the newly drafted fiber, if you let the thread hang slack, the twist cannot travel up.
Adding Twist
It should be time to add more twist to your thread. What you are doing in this process is storing up extra twist, using most of it up drafting new thread, then adding more twist to strengthen your thread. Stop drafting now, while pinching off the twist in your fiber hand and pick up the spindle with your drafting hand and give it a spin or two. Stop the spindle before it slows to the point of reversing the spin and hold the spindle with your drafting hand. Allow the yarn to relax by moving your hands a little closer together. You want to have enough extra twist stored up to allow you to draft more. If the relaxed yarn snarls up and makes little twists on itself you have enough twist, if it lays limp you must add more twist to keep going. You may find that the fibers seem loose or will not hold together this means you have drafted too many fibers for the amount of twist stored, move your fiber hand back along the thread to where the fibers are staying together and spin the spindle again. Let it spin a while, then stop it and park it and slide your hand back over the loosely twisted yarn to allow the twist to run up into it. Stop when you reach undrafted fibers, spin the spindle a time or two to store up some extra twist and repeat the drafting process.
Recap
You are:
- Pinching off the twist at the fiber mass with your fiber hand.
- Spinning the spindle to store up extra twist, then stopping it and parking it.
- Replacing your fiber hand with your drafting hand in pinching off the twist then gently sliding more fibers from the mass.
- Pinching off the twist with your fiber hand and releasing the twist from your drafting hand, allowing the twist to enter the newly drafted fibers.
- Repeating this process a couple of times and then checking to see if you have enough twist to keep going by allowing slack in the yarn. If it curls up on itself, keep going, if it is limp or barely curling up on itself or drifting apart, store up more twist in the singles by spinning the spindle again.
My Arms Aren't Long Enough!
When you are at a point where your arm is up in the air over your head and you are no longer comfortable, you have almost completed a length of singles. Put extra twist into this length before storing it and moving on. This extra twist to helps the thread hold together, and then add even more twist to balance out the yarn when it is plied. Plying yarn takes twist back out of the singles so you need that extra twist in there now.
Give the spindle a couple of twists and look at what you’ve got—take the spindle in your drafting hand and continue to pinch off the twist on the other end with your fiber hand. Allow some slack and the thread should immediately start curling up on itself making spiky twists. It should feel a bit "spongy". If it doesn’t do this in many places you need to add more twist, if it’s curling all over the place–good! (Just so you don’t have a snarled mess!) If you need to add more twist, suspend the spindle, give it a twist, and then test it again.
Storing the Finished Thread
When you are satisfied with the twist, unwrap the leader from the hook and wind the singles around the spindle under the whorl. As you get more and more singles wound you want to form a cone shape, larger on the top (just under the whorl) and smaller on the spindle further down. Leave enough thread off the cone so that you can wrap it up over the whorl and around the hook and still have a couple of extra inches to keep going.
I'm Out of Wool!
Your 6-inch strip of wool will be used up pretty fast. When you are about an inch from the end you add another strip of fibers by laying the new strip over a fanned out section of the old piece (that is not yet twisted) and draft these new fibers out with the old.
Troubleshooting
- If the spindle gets away from you and the twist runs up into the fiber mass making a big bunch (not uncommon when you are learning), stop and park the spindle, untwist the fiber mass—you can do this by letting it hang down and holding the singles at the last place it was even—then start again in the process of drafting.
- If you find that there are "fat spots", known as slubs in your yarn or thick spots and thin spots, you can enjoy them—you have spun novelty yarn that really looks lovely when plied and used. Most spinners who have been spinning for a while find that their thread becomes thinner and thinner and they can no longer make slubs, even when they want to! If the slubs bother you, you can remove them by pinching the yarn with both hands on either side of the slub (a little back from the slub) and untwisting it until the fibers draft out a bit.
IMPORTANT! Do not tug on the slub; if it doesn’t easily slide a bit then continue to untwist until it does. If you tug you risk breaking the yarn. - Yarn drifts apart or pulls apart–add more twist. To connect the ends again untwist both ends and fan out the fibers. Lay one side on top of the other and draft the fibers out together, running your drafting hand over the join.
- Yarn is snarled and becomes tangled. Draft out some of this extra twist by drafting out more fibers.
- There will come a time when your cone of singles will be too heavy for the spindle and it will wobble a lot as you are spinning it. It’s time to stop spinning now and take your yarn off the spindle.
Removing the Thread
Once your spindle is full it is time to take the thread off the spindle and store it until you have spun another thread to ply it with. There are many ballwinders and other contraptions you can get to aid in this process. For now it is easiest just to wrap the singles into a ball as you do a ball of yarn. You can let the spindle just run free, if this proves to be a problem you can put a hole in the bottom of a shoe box that is larger than the spindle and set the spindle in it. Another way is to sit cross-legged on the floor and put the spindle in between your toes!
Plying
Once you have spun two or more balls of singles, it’s time to ply your yarn. For simplicity’s sake we will refer to two-ply yarn, but if you want to do three or more plies, simply add them to this process.
Put each ball of yarn into a mug—this will keep them from rolling all over the room and getting caught behind furniture, etc. Pull out the end from each ball (it sometimes helps to thread the end through the handle of the mug). Put the ends through the loop in the end of your leader, just like you did with the fiber, folding it back onto itself and gently holding the ends back onto the two singles in between the thumb and index finger of your fiber hand. Your fiber hand will do all the pinching this time and your drafting hand will do nothing but spin the spindle and occasionally run up the length of the yarn making sure that the two threads are fed evenly into the yarn you are making. Give the spindle a spin to the left for a S-twist (make sure you are going in the opposite direction that you used to spin the threads), until the ends are firmly twisted in with the singles. Now just pull out lengths of the two threads and spin the spindle until it looks like it’s nicely twisted together. Try and feed the two threads evenly. Test the yarn by holding the spindle and letting the yarn go slack—it should not curl back on itself at all. If it does not it’s called a well-balanced yarn. If it does curl back on itself, pull some more of the unplied singles out of your fiber hand and let the twist run up into it and test again.
If you have a well-balanced yarn but it has wide gaps between the places where the two singles twist together so it will be difficult to use later, there are two things you must do. First, take note! Your thread did not have enough twist in it to counter balance the untwisting done when plying. Make a note to put more twist in the next singles. To correct this yarn, put more spin in the plied yarn, it may even require putting in enough twist so that it curls back on itself-you can correct this (as long as it’s not extreme) when you finish the yarn.
You may find that you have a well-balanced yarn that has gaps but also has snarls in the singles. This means you have not put enough twist in the plying process to counteract the extra twist in the singles. Again, add more twist to the plied yarn until the snarls disappear.
If you are not satisfied with the tightness of the plied yarn until it’s over-twisted, go ahead and over twist some (but not to extreme). You will fix this problem in finishing.
When you have plied your threads to arm’s length and tested it, wind the plied yarn underneath the whorl for storage and as before, wrap the end around the hook and ply the next length until you have plied all the singles in both balls. If one ball has a bit longer thread than the other ball, break off the longer thread to end.
Finishing Your Yarn
It’s time to finish your yarn. Finishing your yarn means setting the twist and, sometimes, blocking the yarn. To set the twist you need to wrap your yarn into a hank. You can do this easily by wrapping the yarn across your palm down around your elbow (which is bent) and up around your palm until you have used up all the yarn. Tie the ends loosely around the hank. You may wish to tie some other string or yarn loosely in other places around the hank to prevent tangles.
Setting the Twist
To set the twist, soak the yarn in hot soapy water. This will gently clean out any spinning oil that may have been used in the preparation process as well as make the singles more cohesive into a stronger yarn. You can do this in the kitchen sink. Fill both sinks at the same time with hot water-as hot as you can stand or even hotter! Put a good squirt of dish soap in one sink and a dash of vinegar in the other. Gently lay the hank of yarn on top of the water in the soapy sink and lightly push it down into the water. It is important not to swish the hank or add any movement to it at all that is not necessary. One push in to saturate the fibers is enough movement. Wool will felt if given a lot of agitation in hot water. Let it soak for 10-20 minutes then remove the hank and gently immerse it in the vinegar water to rinse. Let it soak a few minutes. The water should be cooling by now. Test the vinegar water and refill the first sink with water that is roughly the same temperature for any further rinses. Some spinners add a squirt of hair conditioner to the last rinse to soften the wool. You may wish to try this.
Blocking and Drying
Remove the hank from it’s final rinse and remove excess water by either wrapping it in a towel and stomping on it or putting it in the spin cycle of your washing machine (you may want to put it into a lingerie bag). The hank should be hung to dry—hang it over a hook in the shower or the showerhead. The hank should hang straight and not twist on itself, if it does it is over twisted, you can fix this by blocking the yarn. Put a can of soup in the cradle formed at the bottom of the hung hank and let it remain there until the yarn is dry.
In Conclusion
If you enjoyed all this you will want to further your knowledge and experience! Even if you didn’t enjoy it, you might like to know more about spinning or give it another try, so contact your local guild or your community college for further instruction. There are also many wonderful books and videos that are a great help. If you hated the whole idea or just don’t like spinning after all, your spindle and wool will look very pretty in a basket on the hearth.
Happy Spinning!
![]()
These instructions have been brought to you by Carol Cassidy-Fayer, the maker of Lollipops! high quality, handmade, hand painted drop spindles and spinning tools, and author of the book, "Spinning With a Drop Spindle". Visit her web site at http://www.handspinning.com/lollipops to see the Lollies.